


| Version 61 (modified by , 12 years ago) (diff) |
|---|
Contents
Orchestrates AWS cloud resources using boto and pychef
Notice: This plugin is unmaintained and available for adoption.
Description
This plugin is meant to fill the coordination gap between AWS and Chef, especially:
- Launch an ec2 instance, bootstrap it with chef and apply one or more chef roles
- Terminate ec2 instances and delete its chef node (and client)
- Execute commands (e.g., deployments) to ec2 instances based on environment or role

There are additional features and quite possibly more to come, but the focus is on orchestrating between AWS and Chef inclusive of managing ec2 instances based on environment or role.
This plugin is highly configurable but is opinionated in some ways. Some of these opinions could be relaxed (submit a ticket!) but they currently are:
- Uses knife bootstrap to bootstrap instances - and so your instances' OS must support this method.
- Assumes the same credentials and security (e.g., keypair) are used for all instances.
- Allows one or more roles (but no recipes) to define a node's run_list.
This plugin relies heavily upon boto and pychef. Special thanks to coderanger for his work and responsiveness on pychef.
Configuration
- Install the plugin (after downloading and unzipping):
cd cloudplugin/0.12
sudo python setup.py install
See TracPlugins for more installation details and options. You'll likely need to restart Trac's web server after installation.
- Enable the plugin in
trac.ini:[components] cloud.* = enabled
You can alternatively use the Trac Web Admin GUI.
- Configure the main
trac.inisection. A minimal configuration would look like this:[cloud] aws_key = <aws-access-key> aws_secret = <aws-secret-key> aws_keypair = <ec2-keypair-name> aws_keypair_pem = /path/to/keypair.pem aws_username = <ec2 ssh username - e.g., "ubuntu" or "root"> chef_base_path = /path/to/.chef chef_boot_run_list = <list-of-roles-or-recipes>
- Optional
trac.iniconfigurations (details below).[cloud] rds_username = <rds-master-username> rds_password = <rds-master-password> jabber_server = <jabber-server> jabber_port = <jabber-port> jabber_username = <jabber-username> jabber_password = <jabber-password> jabber_channel = <jabber-channel>
AWS access configuration
The aws_* and rds_* options (see example above) are for your AWS credentials and security information. For more info, see here.
Chef access configuration
Your Trac instance must already have been configured using knife configure. For more info see here. Set the chef_base_path option to the standard chef directory that contains the knife.rb and client pem files needed to connect with the chef server. Common settings for this option are /etc/chef or /home/<username>/.chef. Be sure that the validation.pem file is located where the knife.rb file says it should be.
Jabber configuration
You can optionally configure notifications to jabber/xmpp for commands and environments via the jabber_* options. To enable for only deployments, for example, set a notify_jabber param in the [cloud.environments] section as follows:
[cloud.environments]
notify_jabber = deploy
If you wanted to include audits, simply set the value to deploy, audit instead. To enable jabber notifications for other commands, list which ones to enable in the [cloud.commands] section:
[cloud.commands]
notify_jabber = apacherestart, apachestop, apachestart
Bugs/Feature Requests
Existing bugs and feature requests for CloudPlugin are here.
If you have any issues, create a new ticket.
Download
Download the zipped source from [download:cloudplugin here].
Source
You can check out CloudPlugin from here using Subversion, or browse the source with Trac.
Examples
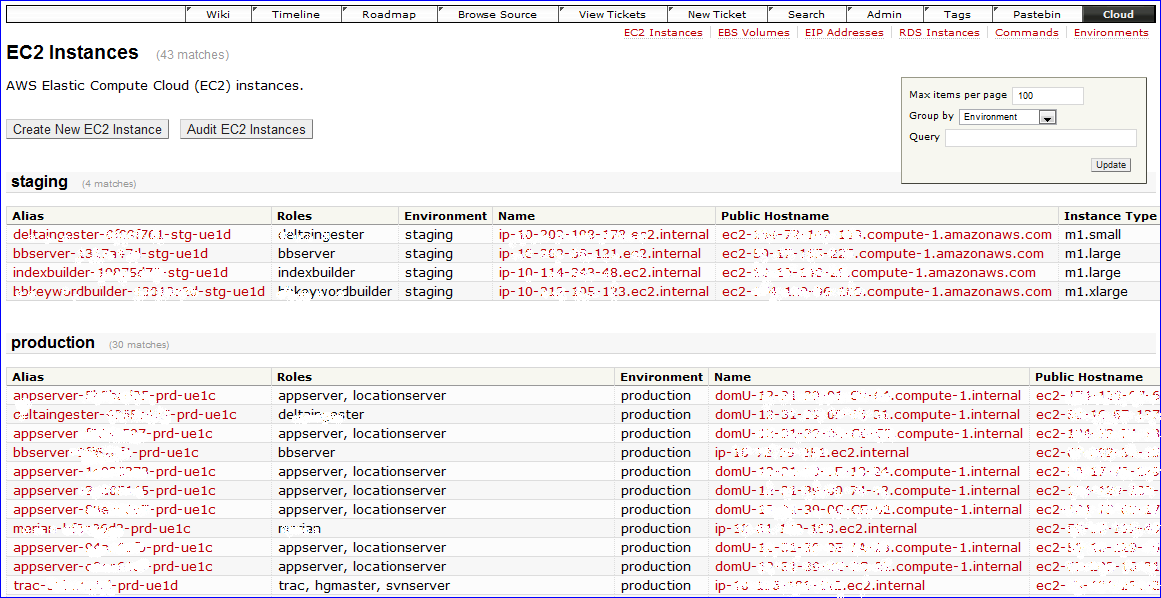
This plugin is designed to support multiple AWS resource types, the most notable being ec2 instances.
EC2 Instances
The configuration for the ec2 instance resource type has reasonable defaults all of which can be overridden in its own trac.ini section:
[cloud.instance]
...
The different configuration options are broken out below.
Labels and such
[cloud.instance]
title = EC2 Instances
order = 1
label = EC2 Instance
description = AWS EC2 instances.
The title and order options are used for contextual navigation - see screenshot above. The order should start with 1. If order is set to an empty string then the resource will not be shown in the contextual menu (but is still accessible by its url). The label value is displayed in various buttons and forms for the name of a single resource item. The description option is displayed in the grid view - see screenshot above - much like a Trac report description.
Field Definitions
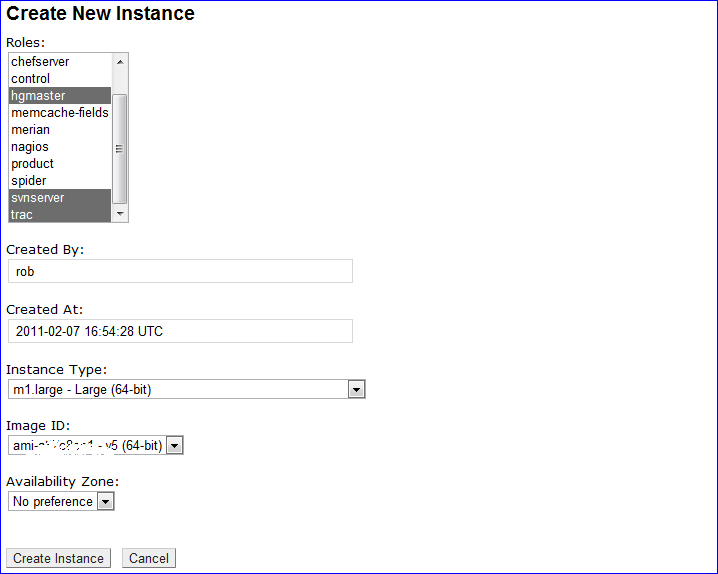
The fields shown in each view can be configured. Fields are first defined much like Trac custom fields but prefixed with field.:
[cloud.instance]
 ..
field.name = text
field.name.label = Name
field.name.handler = NameHandler
field.run_list = multiselect
field.run_list.label = Roles
field.run_list.index = role
field.run_list.handler = RunListHandler
field.ec2.placement_availability_zone = select
field.ec2.placement_availability_zone.label = Availability Zone
field.ec2.placement_availability_zone.options = No preference|us-east-1a|us-east-1b|us-east-1c|us-east-1d
field.ec2.placement_availability_zone.value = us-east-1c
 .. many more fields ..
Each field.* option must map exactly to its chef attribute name. For example, ec2.placement_availability_zone above maps to the ec2 attribute namespace and the placement_availability_zone attribute within that namespace in chef. This field is defined as a select field with a display label and several options separated by a pipe (|) just like Trac custom fields. There are some important differences to Trac custom fields, however:
- A field can define a search index instead of options
- A field can define a "field handler"
Search indexes for options
You may prefer to define a select (or multiselect) field's options by using a chef search index (e.g., the built-in node or role, or a data bag) instead of listing them in the trac.ini file. For example, a field defined like this:
[cloud.instance]
 ..
field.ec2.ami_id = select
field.ec2.ami_id.label = Image ID
field.ec2.ami_id.index = ec2_ami_id
will query chef for and use a ec2_ami_id data bag items. The individual data bag items should be formatted like this:
{
  "id": "ami-xxxxxxxx",
  "value": "ami-xxxxxxxx",
  "name": "ami-xxxxxxxx (64-bit)",
  "order": 1
}
The name will be used as the option's displayed name and the value will be used as the option's value. If an order field is provided, it will be used to order the options accordingly (much like custom field ordering).
Field handlers
A field handler converts a raw chef attribute value into something more human-readable and vice-versa. For example, the RunListHandler defined above for the run_list field extracts roles from a chef node's run_list and displays them in an easy-to-read way. It also converts data the other direction - i.e., it converts the list of roles from a web form into the correct format to set the node's run_list.
Other field handler examples include displaying a url to a web site at a specific port, converting epoch's to dates and times, etc. See handlers.py for the full list of provided field handlers and defaults.py for examples of which fields they're used for by default
Views
In addition to field definitions, you can define which fields should be viewed in which views, their order, and whether or not a field should be read-only in that view. Example:
[cloud.instance]
 ..
crud_view = name, ec2.instance_type, ohai_time, ..
crud_new = run_list, created_by, created_at, ..
crud_edit = run_list, created_by, created_at*, ..

grid_columns = name, ec2.instance_type, ohai_time, ..
grid_sort = ohai_time
grid_asc = 0
The crud_view, crud_new, crud_edit, and grid_columns options are lists of field names in the order to be displayed in their respective views. ("crud" stands for "create, read, update, delete".) An asterisk (*) appended to a field name (only applicable for crud_new and crud_edit) indicates that the field should be read-only in that view. All fields in the crud_new and crud_edit views will be used to set or update the chef resource item.

The grid_sort and grid_asc are for default sorting in the grid view.
RDS Instances
RDS instances can be created and deleted using this plugin. The rds instance resource type is configured almost identically to ec2 instances (see above). One important difference is that the list of rds instances and their attributes are saved in a chef data bag. This makes their attributes available to chef recipes. In order to ensure that this data is up-to-date, you can click on the "Audit" button in the grid view.
EIP Addresses
EIP Addresses can be created, associated with instances, and deleted using this plugin. The eip address resource type is configured identically to rds instances (see above).
EBS Volumes
EBS Volumes can be created, attached or detached to instances, and deleted using this plugin. The ebs volume resource type is configured identically to rds instances (see above). The plugin will also allow you to optionally attach an EBS volume upon launching an ec2 instance.
Commands
To help manage many ec2 instances, you can define commands to be run on them in the "Commands" section. The command resource type is configured similarly to ec2 and rds instances. Their data is maintained in a chef data bag. An example command may look this this:
/usr/bin/ssh -i %(keypair_pem)s root@%(host)s "service apache2 restart"
The %(keypair_pem)s will get replaced with the aws_keypair_pem as defined in trac.ini's [cloud] section (see above). Also, %(host)s will get replaced with the public DNS name of each host. Hosts are selected by environment and/or role.
Environments
With Chef 0.10 comes support for environments. This plugin builds on complements this support by allowing AWS resources belong to one and only one environment. For example, there's a default env field (which is currently distinct from the chef_environment built-in field in chef 10.x) that can get set when creating a new ec2 or rds instance. The environment resource type also allows you to define and set attributes per environment via the plugin's webui. For example, you can set different version control repo branch names and/or changesets per environment so that the right source code gets deployed to each environment.
Deploy and Audit
There are two special commands that can be defined: "deploy" and "audit". A command with a "deploy" ID will cause a "Deploy" button to appear in an environment's View along with widgets to select which role(s) should be used to identify the instances to which to deploy. The 'deploy' script itself is left for you to define as such scripts often require significant logic specific to your system.
Similarly, a command with an "audit" ID will cause an "Audit" button to appear in an environment's View along with widgets to select which role(s) should be used to identify the instances of which to audit. The 'audit' script itself is left for you to define as such scripts often require significant logic specific to your system. If a JSON list of HTML strings is returned, then these HTML snippets are concatenated at the end of each listed node in the progress view (see below) thus providing the audit details. For example, you can return links to the diffs between the target repo changeset and the node's current repo changeset (which is how we use this audit feature).
Progress views
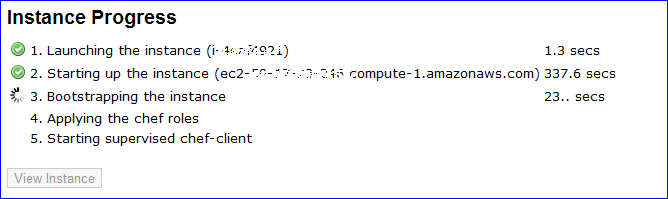
Actions such as launching or bootstrapping an ec2 instance or deploying code to an environment can take a variably long time - usually longer than the default Apache timeouts (e.g., FcgidIOTimeout). Instead of wrestling with Apache timeout configurations, this plugin executes each of these actions in a separate, spawned process (an orphaned daemon) that survives Apache timeouts and restarts. Surviving Apache restarts is also helpful when Trac itself is chef-managed and may be restarted by the chef-client upon config changes. Creating a new ec2 instance, executing remote commands, etc. now brings up a new 'Progress' page that tracks the spawned process' progress:

For launching ec2 instances, as the instance id and public DNS become known, they're presented. The progress view is also used for other (potentially) long-lived actions such as deployments and audits where the list of nodes is shown with the same progress icons and time durations.
Recent Changes
- 14004 by rjollos on 2014-07-12 18:27:48
-
Correct
licensekeyword argument insetup.py. Refs #11832.
- 13996 by rjollos on 2014-06-25 00:56:32
-
Fixed author in COPYING file. Refs #11832.
- 13994 by rjollos on 2014-06-25 00:51:36
-
Changed to 3-Clause BSD license with permission of author. Refs #11832.
(more)
Author/Contributors
Author: robguttman
Maintainer: robguttman
Contributors:
Attachments (4)
- nav.png (2.2 KB) - added by 13 years ago.
- instance-new.png (28.5 KB) - added by 13 years ago.
- progress.png (15.6 KB) - added by 13 years ago.
- instance-grid.png (118.5 KB) - added by 13 years ago.
Download all attachments as: .zip